Automatically converting and bundling audio files for iPhone app
December 30, 2009 Filed in: iPhone
If you’re working with sound sources that are not iPhone optimized, you can set up a custom XCode build rule to convert them and install them for your iPhone application.
Apple documentation offers some instruction on how to set up custom rules and how to convert the audio to its optimal format. I had trouble figuring out how to get the build rules to automatically move files to the application bundle.
You can tell XCode to move specific files to the application bundle by dragging them into the “Copy Bundle Resources” under the “Target” section in the Groups & Files (left panel) area of the main XCode window. However, I wanted to be able to put any .wav or .aif file into the source area, have the build process convert it AND copy it to the application bundle.
This was my solution:
Create the rules
First you need to create the convert rules within XCode. To create new rules, control-click the name of your application under the Target section in the XCode left panel and choose “Get Info”:
Pasted Graphic 2
Choose “Get Info”. You’re going to go to the “Build” tab of this window and make it look like this:
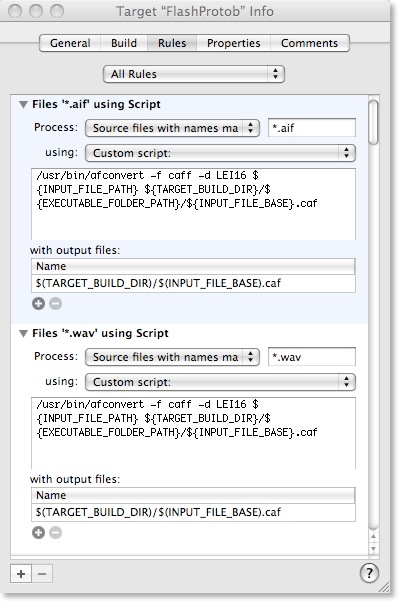
Make sure you click on the “Rules” tab to get to that subpanel.
To create a new rule, you’ll need to click the “+” in the Lower Left corner of the window. Click it once to get a new rule for the .wav file.
Under “Process” pull down menu, choose “Source files with names matching:” and type into the resulting field
Under the “using:” pull down menu, “choose Custom script:” and type into the resulting field:
The variables you’re using are:
This command will tell you to convert the audio file that has matched the rule (e.g., buzzer.wav matches *.wav) and put the output into the actual application bundle, so that your application can access it.
You’ll need to specify which output files are generated. Click the little “+” in the circle under the field “with output files:”, and type into the resulting field:
Repeat the whole process for a new rule, except under “Source files with names matching:” you’ll type into the resulting field
Note that the rules for both of these types of fields are exactly the same. I tried to create one rule, using
but this did not work. So, for now, I use two rules.
Adding the source files into the project
For XCode to convert these files, it will need to treat the audio files as source files. When you add your original .wav and .aif audio files into your project, you’ll want to also add them into the “Compile Sources” area under your target:
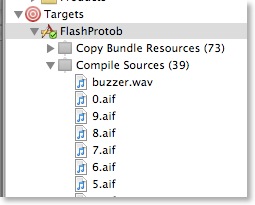
Note: Make sure that the original audio files are not in the “Copy Bundle Resources” area, otherwise you will end up with the .wav or .aif files in your application bundle, too.
Obstacles that frustrated me:
When I first started making custom rules, it took a while for me to notice that the build script used curly brackets for its environment variables, while the output files area used parentheses for its variables. It’s hard to see the difference!
It also took me a while to figure out that I needed to specify that the output went directly into the application bundle. This is because of two things: (a) the copy phase of the build normally occurs before the compilation phase; (b) I could find no way to specify that the resulting files of the build be used by a secondary copy phase you can create to move it to the application.
Apple documentation offers some instruction on how to set up custom rules and how to convert the audio to its optimal format. I had trouble figuring out how to get the build rules to automatically move files to the application bundle.
You can tell XCode to move specific files to the application bundle by dragging them into the “Copy Bundle Resources” under the “Target” section in the Groups & Files (left panel) area of the main XCode window. However, I wanted to be able to put any .wav or .aif file into the source area, have the build process convert it AND copy it to the application bundle.
This was my solution:
Create the rules
First you need to create the convert rules within XCode. To create new rules, control-click the name of your application under the Target section in the XCode left panel and choose “Get Info”:
Pasted Graphic 2
Choose “Get Info”. You’re going to go to the “Build” tab of this window and make it look like this:
Make sure you click on the “Rules” tab to get to that subpanel.
To create a new rule, you’ll need to click the “+” in the Lower Left corner of the window. Click it once to get a new rule for the .wav file.
Under “Process” pull down menu, choose “Source files with names matching:” and type into the resulting field
*.wavUnder the “using:” pull down menu, “choose Custom script:” and type into the resulting field:
/usr/bin/afconvert -f caff -d LEI16 ${INPUT_FILE_PATH} ${TARGET_BUILD_DIR}/${EXECUTABLE_FOLDER_PATH}/${INPUT_FILE_BASE}.cafThe variables you’re using are:
- INPUT_FILE_PATH = complete path of the source file (e.g., /Users/flurry/..../buzzer.wav)
- TARGET_BUILD_DIR = where the application is being built
- EXECUTABLE_FOLDER_PATH = the name of the application bundle directory (e.g., MyProgram.app)
- INPUT_FILE_BASE = the file name base of your original source (e.g., buzzer)
This command will tell you to convert the audio file that has matched the rule (e.g., buzzer.wav matches *.wav) and put the output into the actual application bundle, so that your application can access it.
You’ll need to specify which output files are generated. Click the little “+” in the circle under the field “with output files:”, and type into the resulting field:
$(TARGET_BUILD_DIR)/$(INPUT_FILE_BASE).cafRepeat the whole process for a new rule, except under “Source files with names matching:” you’ll type into the resulting field
*.aif Note that the rules for both of these types of fields are exactly the same. I tried to create one rule, using
*.{wav,aif} // THIS DOESN’T WORKbut this did not work. So, for now, I use two rules.
Adding the source files into the project
For XCode to convert these files, it will need to treat the audio files as source files. When you add your original .wav and .aif audio files into your project, you’ll want to also add them into the “Compile Sources” area under your target:
Note: Make sure that the original audio files are not in the “Copy Bundle Resources” area, otherwise you will end up with the .wav or .aif files in your application bundle, too.
Obstacles that frustrated me:
When I first started making custom rules, it took a while for me to notice that the build script used curly brackets for its environment variables, while the output files area used parentheses for its variables. It’s hard to see the difference!
It also took me a while to figure out that I needed to specify that the output went directly into the application bundle. This is because of two things: (a) the copy phase of the build normally occurs before the compilation phase; (b) I could find no way to specify that the resulting files of the build be used by a secondary copy phase you can create to move it to the application.